
Your telescope eyepiece math collapses to one rule, the exit pupil has to land where your eye actually works.
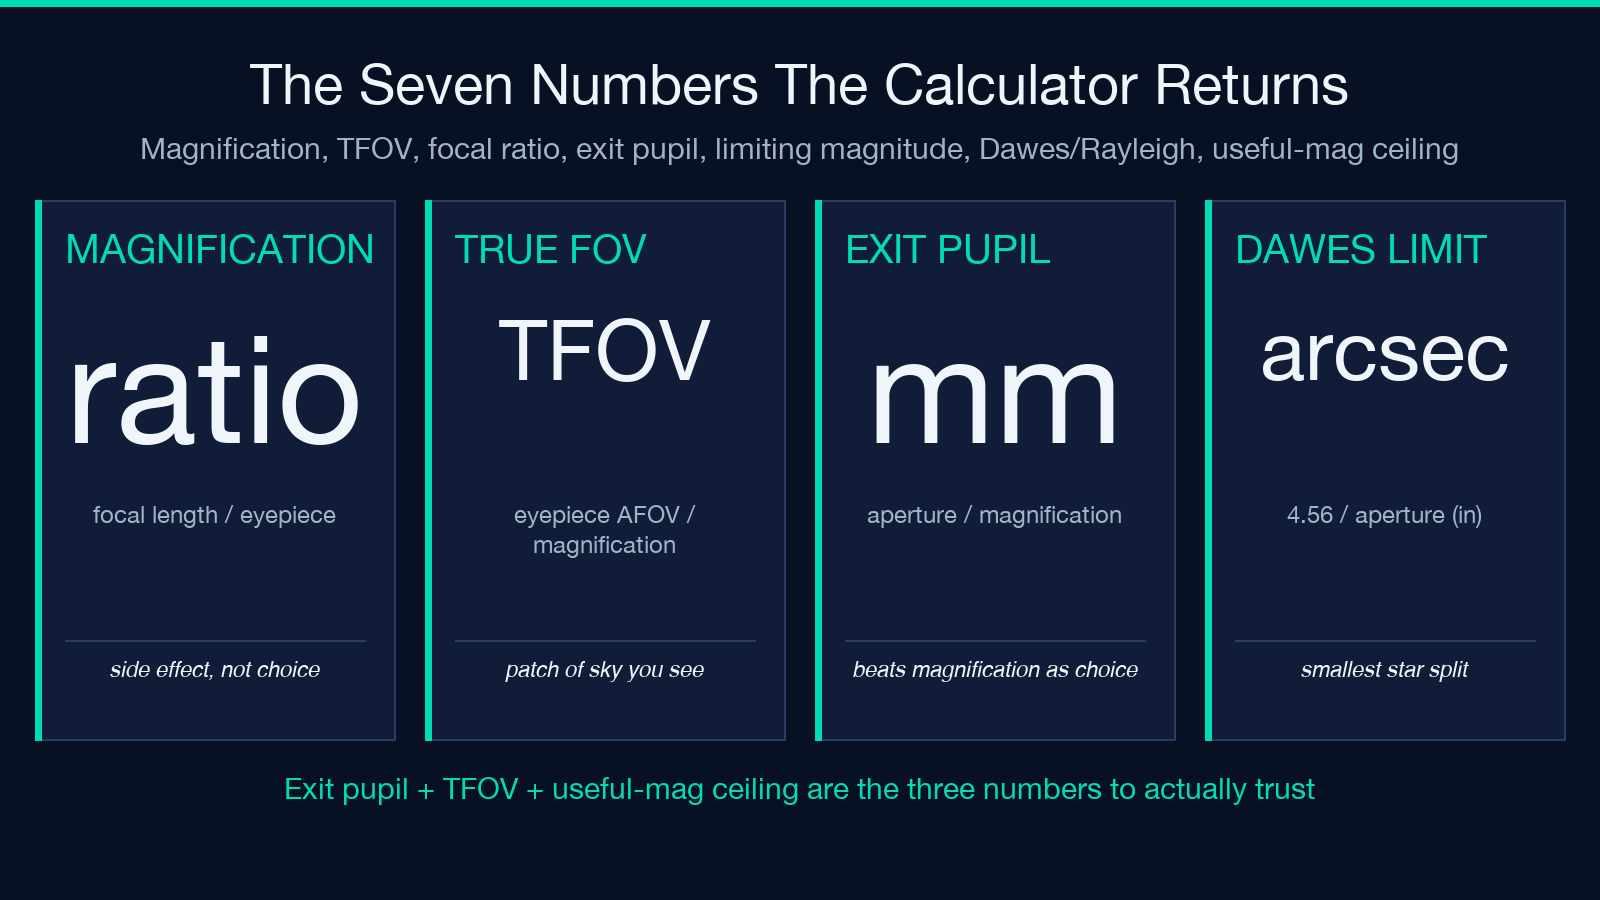
Every eyepiece in your case gives you a different field of view, a different magnification, and a different exit pupil for the same scope, and the one that “looks right” on the box rarely is when you point at the Orion Nebula. The Telescope Field of View Calculator takes four inputs (aperture, telescope focal length, eyepiece focal length, eyepiece AFOV) and produces the seven derived numbers that actually drive what you see at the eyepiece: magnification, true field of view, focal ratio, exit pupil, limiting magnitude, Dawes/Rayleigh resolution, and the useful-magnification range. Pick a target type (deep-sky, planetary, lunar, terrestrial) and it adds a scaled field-of-view overlay and target-specific advice on framing.
The point of this guide is to walk through what each of those seven numbers means, where the formulas come from, and which two or three to actually trust when you’re standing in the dark trying to figure out whether to grab the 32mm or the 10mm. By the end you’ll know why exit pupil beats magnification as a decision variable, why the “lowest useful magnification” line is not a marketing slogan, and how to size framing for a target like M31 before you put the eyepiece in.
Magnification Is a Ratio, Not a Recommendation
Magnification equals telescope focal length divided by eyepiece focal length, and that’s the entire derivation. A 1200mm scope with a 25mm eyepiece magnifies 48x; the same scope with a 10mm eyepiece magnifies 120x. The formula is correct, the formula is universal, and the formula tells you almost nothing about whether the image is going to be sharp or even visible.
The reason magnification alone is a poor decision variable is that it scales two things in opposite directions. As magnification rises, true field of view shrinks (you see a smaller patch of sky), and exit pupil shrinks (less light reaches your eye). Both effects compound: a 200x view of a deep-sky target will show you a region too small to contain the object, and at that exit pupil the image will be too dim to register on your retina anyway. Magnification is a knob; it’s not an answer.
The calculator displays magnification prominently because eyepiece marketing does, but the practical workflow treats it as a side effect of two real choices: which eyepiece you grabbed, and how wide the object is.
True Field of View Is the Patch of Sky You Actually See
True field of view (TFOV) is eyepiece apparent field of view (AFOV) divided by magnification. A 50-degree AFOV eyepiece at 48x gives you 1.04 degrees of true sky; the same eyepiece at 120x gives you 0.42 degrees. The moon is half a degree across, so 1.04 degrees is “moon plus a margin of sky around it,” and 0.42 degrees is “moon, slightly cropped, with no room to point at anything else.”
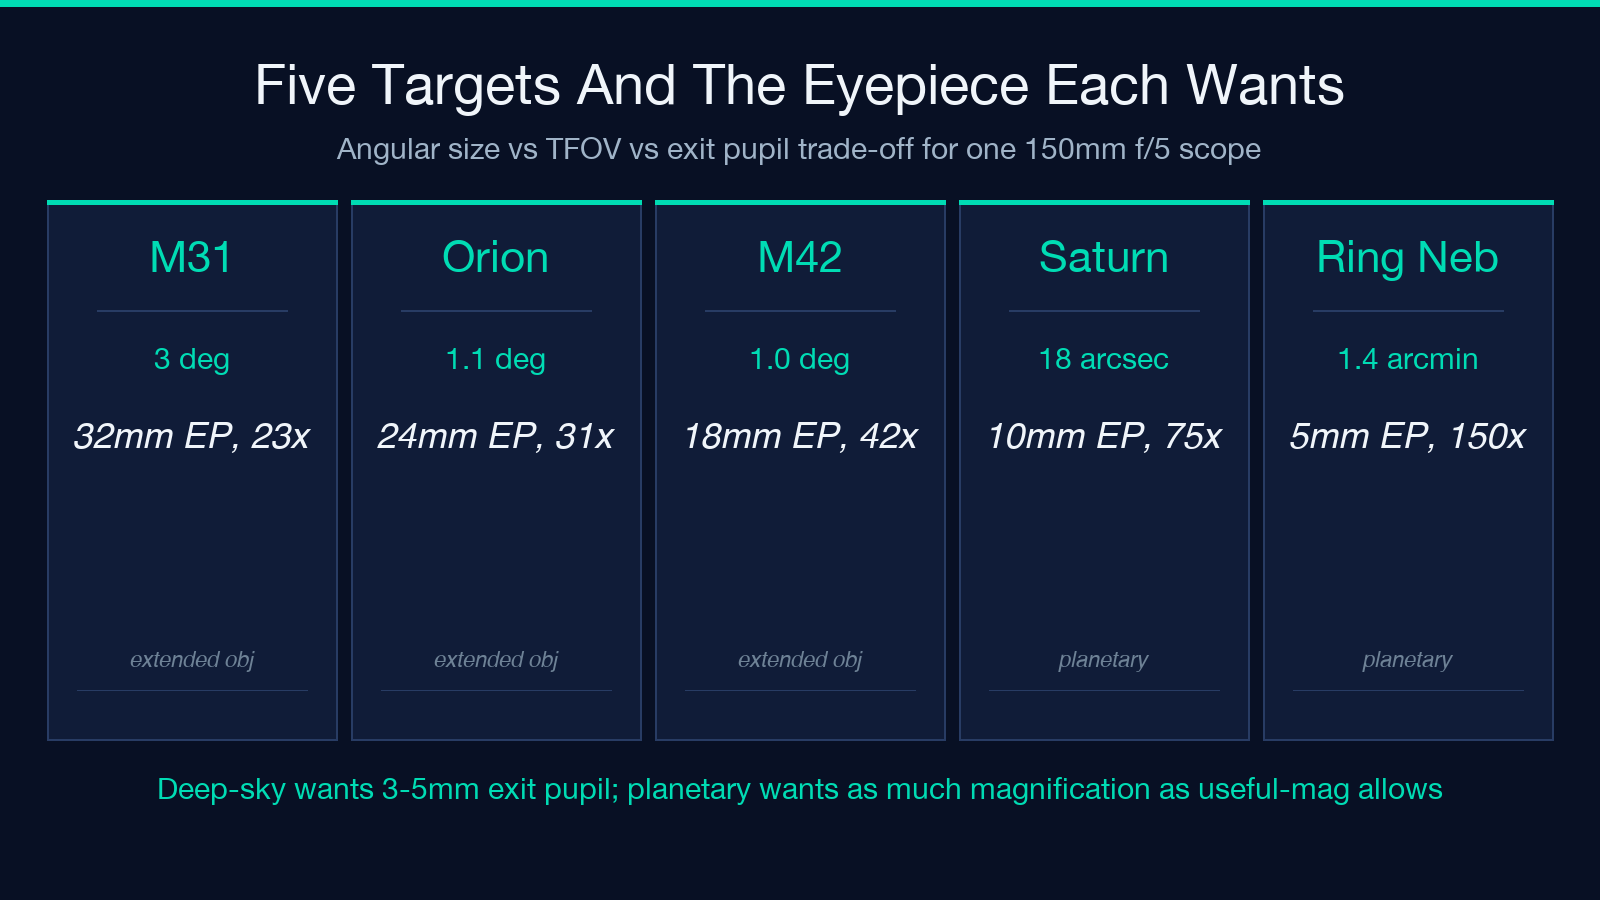
TFOV is the second most actionable number the calculator returns, and the reason it’s actionable is that TFOV is what tells you whether a target fits in the eyepiece before you slew to it. The Andromeda Galaxy is roughly 3 degrees by 1 degree; the Orion Nebula is about 1.1 degrees by 1 degree; the Ring Nebula is 1.4 arcminutes. Each one needs a different eyepiece choice, and the way you figure that out is to compute TFOV and compare against the target’s angular size.
The calculator’s “scaled field-of-view overlay” feature draws a circle at the eyepiece’s true FOV on top of the selected target’s reported size. If the circle envelops the target’s bounding box, your framing works; if the target extends past the circle, you need a longer-focal-length eyepiece.
Focal Ratio Sets the Brightness Budget
Focal ratio is telescope focal length divided by aperture. An f/5 scope is “fast,” an f/12 scope is “slow,” and the practical difference is brightness at the focal plane for the same exposure. Two scopes with the same aperture but different focal ratios show you dimmer images through the slow one at the same magnification, because the slower scope delivers less light per unit area on the eyepiece field stop.
Focal ratio matters most when you’re shopping for eyepieces. A 31mm Nagler in an f/5 scope will correct edge-of-field aberrations; the same Nagler in an f/12 scope is overkill and a 25mm Plossl will do the job for less money. The calculator displays focal ratio alongside the other numbers so you can match eyepiece design to scope design without pulling out a separate spreadsheet.
Exit Pupil Is the Decision Variable You Should Actually Use
Exit pupil is the diameter of the light beam leaving the eyepiece, in millimeters, and it equals aperture divided by magnification (equivalently, eyepiece focal length divided by focal ratio). For a 200mm aperture scope at 48x, the exit pupil is 4.2mm; at 120x, it’s 1.7mm.
The human eye’s dilated pupil can typically admit somewhere between 5mm and 7mm of light depending on age and dark adaptation. Anything bigger than that and you’re wasting aperture: the eyepiece is throwing light at parts of your cornea that aren’t receiving it. Anything much smaller than 2mm and you’re approaching the diffraction limit where resolution collapses into a fuzzy blob regardless of how good the optics are.
This is why exit pupil beats magnification as a decision variable. If you want an exit pupil around 3mm (a reasonable middle value for deep-sky targets), and your scope is f/6 with an aperture of 150mm, the calculator will tell you the matching eyepiece focal length is 18mm. That’s the eyepiece to grab. Magnification is whatever it ends up being; you didn’t choose it, you chose exit pupil.
Limiting Magnitude Tells You What You Can Hope to See
Limiting magnitude is the faintest star your scope can deliver to your retina under good seeing, and it’s mostly a function of aperture. A 100mm scope can theoretically reach magnitude 12.7; a 200mm scope, 14.2. The calculator outputs this so you can sanity-check whether the target you have in mind is even theoretically reachable from your equipment.
Limiting magnitude scales with the square root of aperture, which is why doubling aperture only buys you 1.5 magnitudes, not 2. It’s also why “small scope, dark site” sometimes outperforms “big scope, suburban backyard”: if your backyard’s light pollution limits you to magnitude 11 regardless of how big your scope is, the bigger scope buys you nothing for deep-sky work.
Dawes and Rayleigh Resolution Are Resolution Limits, Not Sharpness Claims
Dawes’ limit (4.56 arcseconds per inch of aperture, or 1.02 arcseconds per 100mm) and Rayleigh’s criterion (1.22 lambda over D, roughly 5.5 arcseconds per inch for visible light) are theoretical diffraction limits: the smallest separation at which two stars can just barely be distinguished. Dawes is the more generous of the two and is what most amateur astronomers treat as a practical ceiling.
The calculator returns both numbers so you can sanity-check whether a claim of “splitting double stars” is plausible. If your Dawes’ limit is 1.2 arcseconds and the target double is 1.5 arcseconds apart, you might split it on a steady night; if the target is 0.6 arcseconds apart, no amount of optical quality will help you.
Useful Magnification Is the Range Where Optics Actually Behave
Useful magnification is approximately 0.2x to 2x aperture in millimeters. For a 150mm scope, that’s 30x to 300x. Below 30x and the exit pupil exceeds the dilated eye and you’re wasting light; above 300x and you’re magnifying the atmosphere more than the target.
The calculator returns this as a range and the practical interpretation is: don’t fight it. If your target wants 400x to see detail, your scope isn’t the right scope for that target tonight. Switch targets or switch scopes; switching eyepieces won’t fix a magnification budget that’s already overdrawn.
Putting It Together for One Target
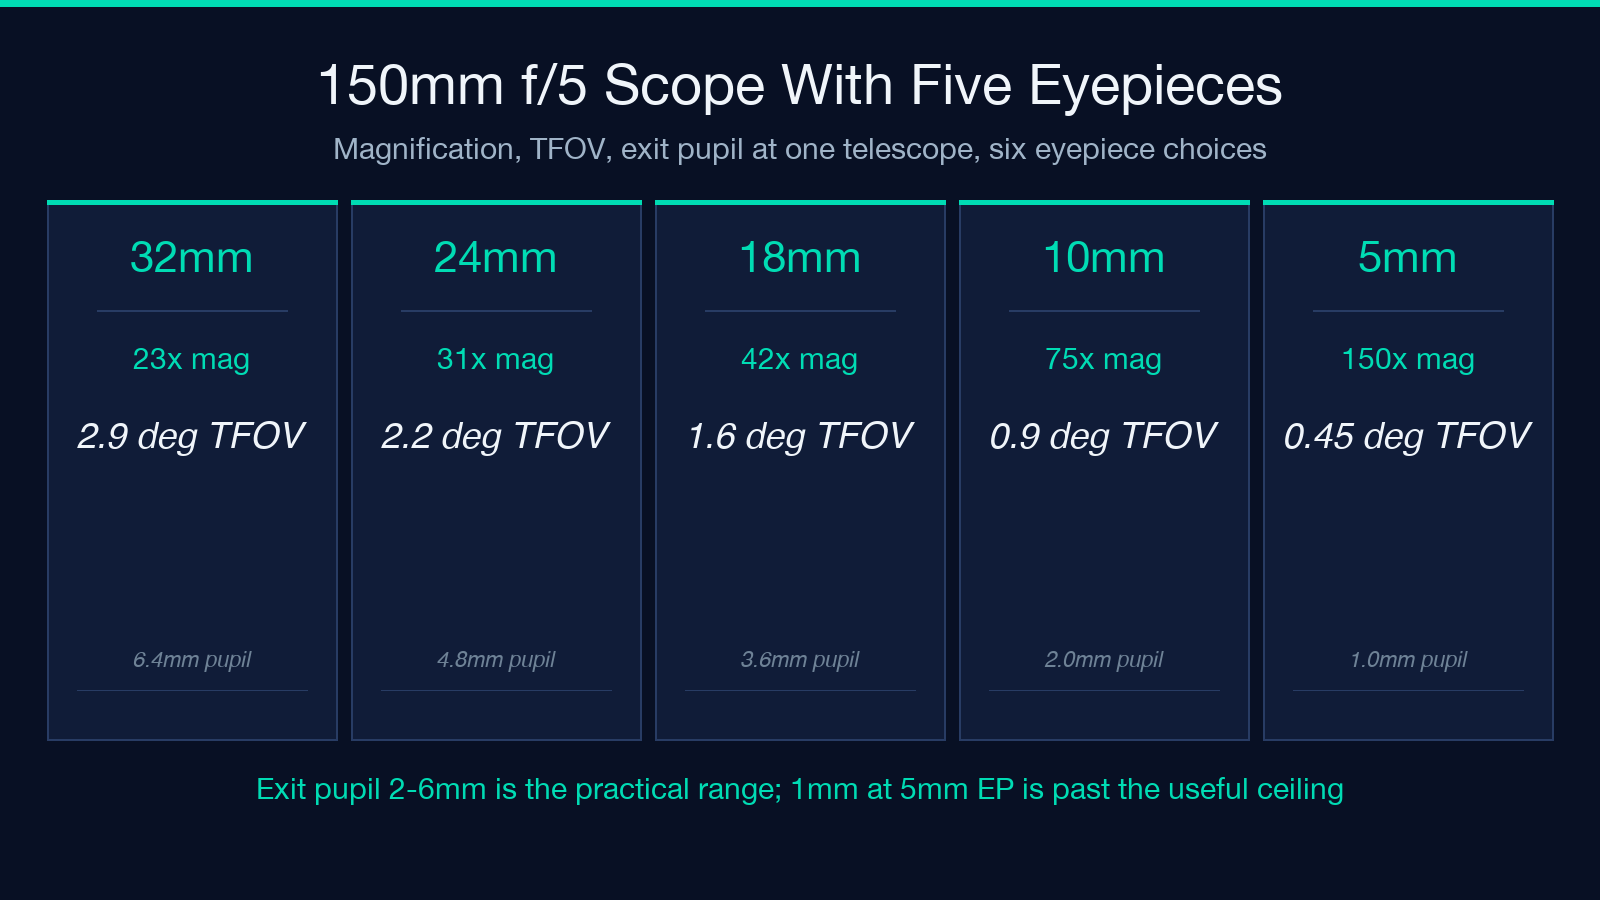
For M31 (the Andromeda Galaxy) at 3 degrees by 1 degree, you want exit pupil around 3-4mm (good brightness on an extended object), and you want TFOV that envelops the 3-degree long axis. A 150mm f/5 scope with a 24mm 68-degree AFOV eyepiece gives 31x magnification, a 2.2-degree TFOV, and a 4.8mm exit pupil, which under frames the galaxy (M31 extends past the field stop). Drop to a 32mm eyepiece and you get 23x, a 2.9-degree TFOV, and a 6.4mm exit pupil, which frames M31 cleanly and lands exit pupil in the range your eye can actually use. The calculator works through that trade-off in a single page once you enter the four inputs and pick “deep-sky” as the target.
For Saturn at 18 arcseconds across, you want high magnification but not so high that you’re past useful-magnification ceiling. The same 150mm f/5 scope with a 5mm eyepiece gives 150x, a 0.45-degree TFOV, and a 1mm exit pupil, which is past the 2mm lower bound; you’ll see Saturn, but you’ll see it dim and probably fuzzy. Drop to a 10mm eyepiece (75x, 0.9 degrees TFOV, 2mm exit pupil) and Saturn sharpens up.
The whole exercise is exit pupil + TFOV + useful-magnification ceiling, with magnification as the consequence. Try it on your own gear at the Telescope Field of View Calculator and you’ll find the eyepiece rotation you actually use is much smaller than the rotation you own.
More astronomy and optics calculators are collected at elysiatools.com.
