
The right insert:vector ratio isn’t a single number — it’s a band that depends on insert length, and the math is just two pmol-of-ends equations the molecular biology kit inserts in your notebook. Most cloning failures blamed on “bad ligase” actually trace to a ligation setup where the insert was dosed in mass (nanograms) while the vector was dosed in molarity (picomoles), so the actual ends ratio ended up ten-fold off from the recipe — and no amount of longer incubation rescues an under-dosed insert. The NEB ligation calculator pairs two formulas (`pmol = ng × 10^3 / (650 × bp)` for both species, then `insert_ng = ratio × vector_ng × (insert bp / vector bp)`) with three length-keyed ratio bands (5-10:1 for sub-200 bp inserts, 3-5:1 for 200-999 bp, 1-5:1 for ≥1000 bp) plus a nM-of-ends check that gates the reaction on T4’s ~1 nM working threshold. Whether you run Solve (compute insert mass from a target ratio) or Check (compute actual ratio from both masses), the algebra is the same and the result fits on a sticky note. That repeatability is what makes a molar-ratio calculator worth using for every ligation, not just the ones that already failed once.
This field guide walks through the molar algebra behind every ligation setup, the three breakpoints that justify the 5-10:1 / 3-5:1 / 1-5:1 ratio bands, and the nM-of-ends threshold that decides whether the reaction will actually proceed at T4 ligase’s working concentration. The worked example uses a 3.2 kb vector plus a 480 bp insert with a 3:1 target ratio; the troubleshooting checklist flags the four failure modes that show up most often (insert concatemers above 10:1, vector-only recircularization below 0.5:1, low-efficiency ligations under 1 nM ends, and high-background ligations above 5 nM ends). The accompanying tool runs both the Solve and Check modes so you can validate an existing setup the same way the recipe says. Educational/lab-planning use only — confirmation by gel and sequencing remains the source of truth for cloning outcomes.
Why the ratio matters more than the absolute mass
A ligation is a bimolecular event: T4 ligase has to find an insert end and a vector end in solution, hold them in proximity, and seal the phosphodiester bond. The reaction rate scales with the concentration of both ends, not with the mass of DNA present. Two picomoles of ends of each species at the same total volume produces the same number of productive encounters whether those ends sit on a 3 kb vector or a 300 bp insert — but only if the per-species end concentration is comparable. Expressing both sides in picomoles is what makes the ratio meaningful, and that’s what the NEB calculator’s `pmol = ng × 10^3 / (650 × bp)` formula gives you.
Once both species are in pmol, the insert:vector ratio is just `pmol_insert / pmol_vector`. A 3:1 ratio means three insert ends for every vector end; statistically, the most common ligation product will be one insert + one vector. As the ratio climbs past 10:1, the modal product shifts to two inserts + one vector — and that’s where the concatemer warnings start. Below 0.5:1, the modal product is vector-only recircularization (the vector snaps shut on itself because no insert end is nearby to compete), which produces massive colony counts on the negative-control plate and zero inserts on the experimental plate. The ratio is the single knob that controls where the ligation product distribution lands.
Most cloning guides express the molar ratio as a function of insert length rather than as a fixed number because the actual optimum depends on what fraction of total ends each species contributes. A 200 bp insert is roughly fifteen times smaller than a 3 kb vector — so 1 ng of insert carries ~30× more ends than 1 ng of vector. The mass ratio that produces a 3:1 molar ratio is therefore wildly different from 3:1; in the worked example below, the 480 bp insert comes out to 28 ng against 100 ng of 3.2 kb vector for a true 3:1 molar ratio. Run both numbers through the Elysia Tools ligation calculator to see how the cancelation of the 650 factor (an average molecular weight per base pair, in g/mol-per-bp-equivalent for dsDNA) makes the ratio algebra length-independent in mass terms.
The two formulas you actually need
The NEB BioCalculator and its descendants (Promega BioMath, Sambrook & Russell’s appendix) all reduce to the same pair of equations. The first converts a mass (ng) of a dsDNA fragment of length (bp) into moles-of-ends:
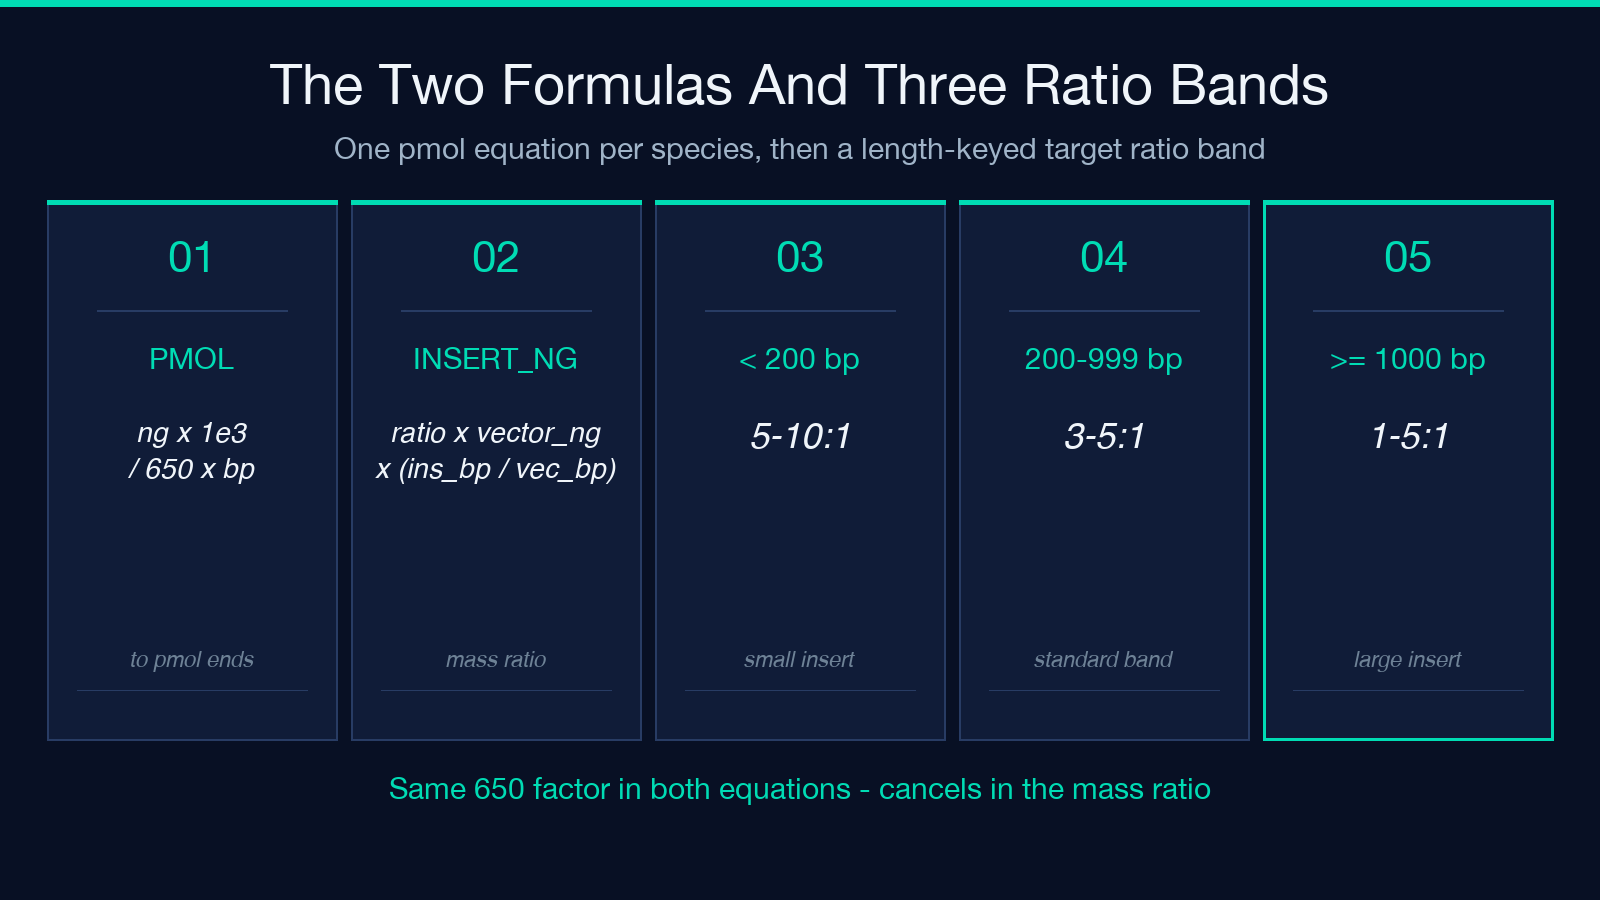
`pmol = ng × 10^3 / (650 × bp)`
The factor 650 is an average molecular weight per base pair in daltons (the exact number depends on the base composition, but 650 ± 50 daltons-per-bp is close enough for ligation setup). The `× 10^3` is the ng-to-pg conversion (1 ng = 1000 pg), and the divisor keeps the result in pmol because 1 pmol of a 1-bp DNA molecule weighs 650 pg. Run this twice — once for the vector, once for the insert — and you have both ends concentrations.
The second formula is the molar-ratio definition expressed in mass units:
`insert_ng = ratio × vector_ng × (insert_bp / vector_bp)`
This is what makes the ratio length-independent in mass. The 650 factor that appeared in the pmol formula cancels (it’s the same average per-bp weight for both species), leaving a mass ratio that scales linearly with the bp ratio. So for a 3:1 molar ratio with a 480 bp insert against a 100 ng aliquot of 3.2 kb vector, the answer is `3 × 100 × (480 / 3200) = 45 ng`, and that’s exactly what the Solve mode returns.
Run the Check mode when you’re reviewing someone else’s setup or recovering from a failed ligation. Feed in both measured masses and both measured lengths; the calculator returns the actual molar ratio. If the result is 0.8:1 when you wanted 3:1, the inserts in the colonies will be a mix of single-ligation and empty-vector — exactly the bimodal colony PCR pattern that wastes a Monday morning.
The three length-keyed ratio bands
Insert length matters because small inserts diffuse faster, find the vector end more often, and (because they’re more numerous per ng) require less mass to hit the same molar ratio. The canonical NEB ratio bands are:
- Under 200 bp inserts — 5:1 to 10:1 molar ratio. A 150 bp insert is small enough that even at a 5:1 molar ratio you’ll see abundant vector-only recircularization. Bumping to 7:1 or 10:1 helps maintain the productive-collision rate. Above 10:1, concatemers start competing with the single-insert product, so 10:1 is a hard ceiling.
- 200 bp to 999 bp inserts — 3:1 to 5:1 molar ratio. This is the standard cloning band and the one most recipes assume. A 480 bp insert at 3:1 against a 3 kb vector is the textbook case; a 700 bp insert at 5:1 is also fine. Below 3:1 you start losing productive collisions; above 5:1 concatemers become visible on gel.
- 1000 bp and above inserts — 1:1 to 5:1 molar ratio. Large inserts are proportionally massive in ng terms, so even a 1:1 molar ratio produces very high mass ratios (e.g. a 4 kb insert against a 3 kb vector at 1:1 gives 1.33 × mass ratio). The cap at 5:1 keeps concatemers out, but lower ratios work fine because the absolute end concentrations are so high.
These breakpoints come from the cell’s own biology more than from T4’s enzymology: at very small insert sizes, the competing event (insert ends finding each other instead of vector ends) becomes dominant because diffusion scales as ~1/sqrt(mass). The 200 bp breakpoint is empirical — it’s where Sambrook’s appendix makes the switch and where the New England Bioload protocol sheet picks up the same advice.
Solve mode vs Check mode: same formula, opposite data flow
The ligation calculator runs in two directions depending on the question you’re asking. Solve mode takes the vector mass (ng), the vector length (bp), the insert length (bp), and the target molar ratio (e.g. 3:1), and returns the insert mass you should add to the reaction. This is the forward direction — what the recipe calls for. Check mode takes both masses and both lengths and returns the actual molar ratio the reaction will see. This is the reverse direction — what the bench actually has after pipetting.
The two modes exist because cloning setups fail in opposite ways. Solve mode fails when the target ratio is unrealistic for the insert length (e.g. asking for 20:1 with a 4 kb insert creates concatemers by construction — no amount of careful pipetting rescues a wrong stoichiometry). Check mode fails when the measured masses don’t match the planned masses — usually a typo, a miscalibrated stock, or a forgotten dilution factor. The same two formulas serve both flows; what changes is which variable is the answer.
The nM-of-ends floor that decides whether ligation actually proceeds
Molar ratio is the rate-controlling knob, but the absolute ends concentration sets the floor. T4 DNA ligase works at a kcat that’s strongly concentration-dependent below ~1 nM DNA ends — below that threshold the productive-collision half-life exceeds the practical incubation time (usually 10-30 min at room temperature or 16°C overnight), and the reaction just doesn’t proceed regardless of how clean the ends are. Above ~5 nM ends, by contrast, the reaction has begun to plateau in kcat (the enzyme is saturated) and you’ve now hit the regime where non-productive collisions (insert-insert, vector-vector) start producing ligation artifacts (concatemers, vector-only).
Computing nM is a third manipulation: take the pmol value, divide by the reaction volume in liters. A 20 µL ligation with 0.04 pmol of vector ends has 2 nM ends — comfortably above the 1 nM floor and below the 5 nM concatemer-risk ceiling. Most bench protocols target 10-50 ng of vector per 20 µL reaction; that’s roughly 0.5-2.5 nM of a 3 kb vector, which sits right in the productive band. If your calculated pmol values give a sub-1 nM ends concentration, the reaction needs more DNA, not more ligase.
This is also why the Ligation calculator’s combined output reports both ratio AND nM-of-ends — the ratio alone won’t catch a setup that has perfect 3:1 stoichiometry but is too dilute to ligate in the time available. Educational/lab-planning use only; the gel and the sequencing chromatogram are the final arbiters.
Worked example: 3.2 kb vector with a 480 bp insert at 3:1
Goal: set up a ligation where the molar ratio of insert ends to vector ends equals 3:1, in a 20 µL reaction with 100 ng of vector. The insert is a PCR amplicon at 60 ng/µL, the vector is a gel-purified NEB-cut backbone at 50 ng/µL.
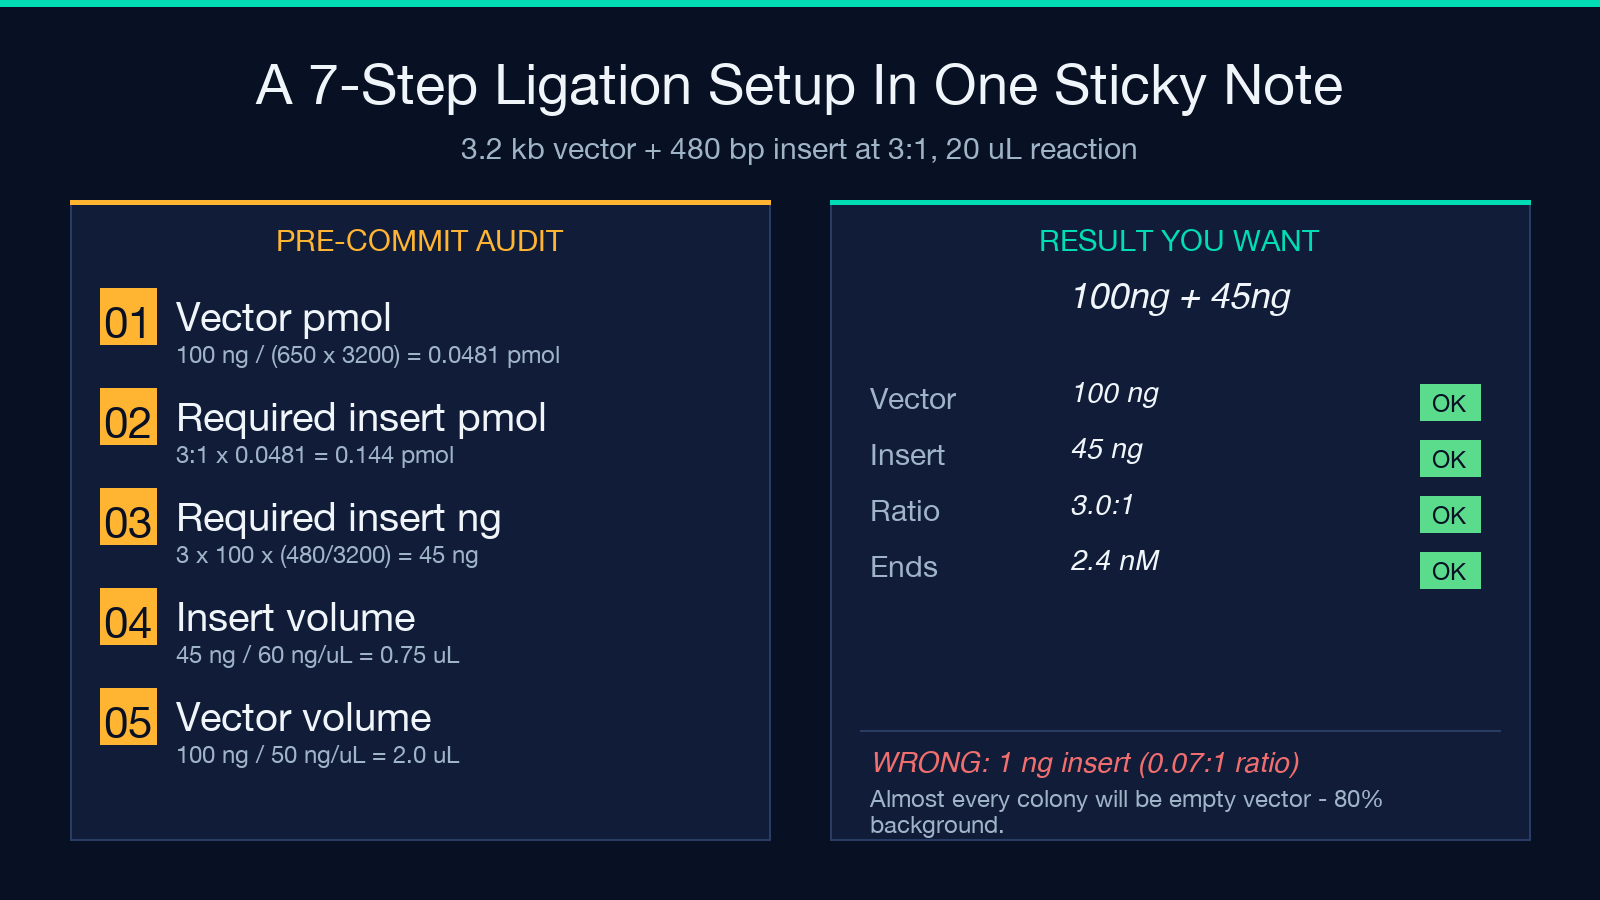
- Step 1 — vector pmol. `100 ng × 10^3 / (650 × 3200) = 100 / 2080 = 0.0481 pmol` of vector ends in the reaction.
- Step 2 — required insert pmol. `3 × 0.0481 = 0.144 pmol` of insert ends.
- Step 3 — required insert ng. `insert_ng = 3 × 100 × (480 / 3200) = 45 ng`. (The 650 cancels; only the bp ratio matters.)
- Step 4 — insert volume from stock. `45 ng / 60 ng/µL = 0.75 µL` of insert stock.
- Step 5 — vector volume from stock. `100 ng / 50 ng/µL = 2.0 µL` of vector stock.
- Step 6 — ends concentration check. `0.0481 pmol / 20 µL = 2.4 nM` — well above the 1 nM floor, well below the 5 nM concatemer-risk ceiling.
- Step 7 — reaction mix. 2.0 µL vector + 0.75 µL insert + 2 µL 10× T4 ligase buffer + 1 µL T4 ligase + 14.25 µL water = 20 µL total.
The post-incubation prediction: a 3:1 molar ratio in the productive nM band should yield mostly circular products with exactly one insert per vector. Colony PCR on 8-16 colonies should show >80% with the insert at the expected size; the ~10-15% empty-vector colonies are normal for a 3:1 setup and can be screened out before sequencing.
Troubleshooting: four failure modes the calculator catches
Most failed ligations fall into one of four patterns, all of which the ratio + nM check identifies immediately:
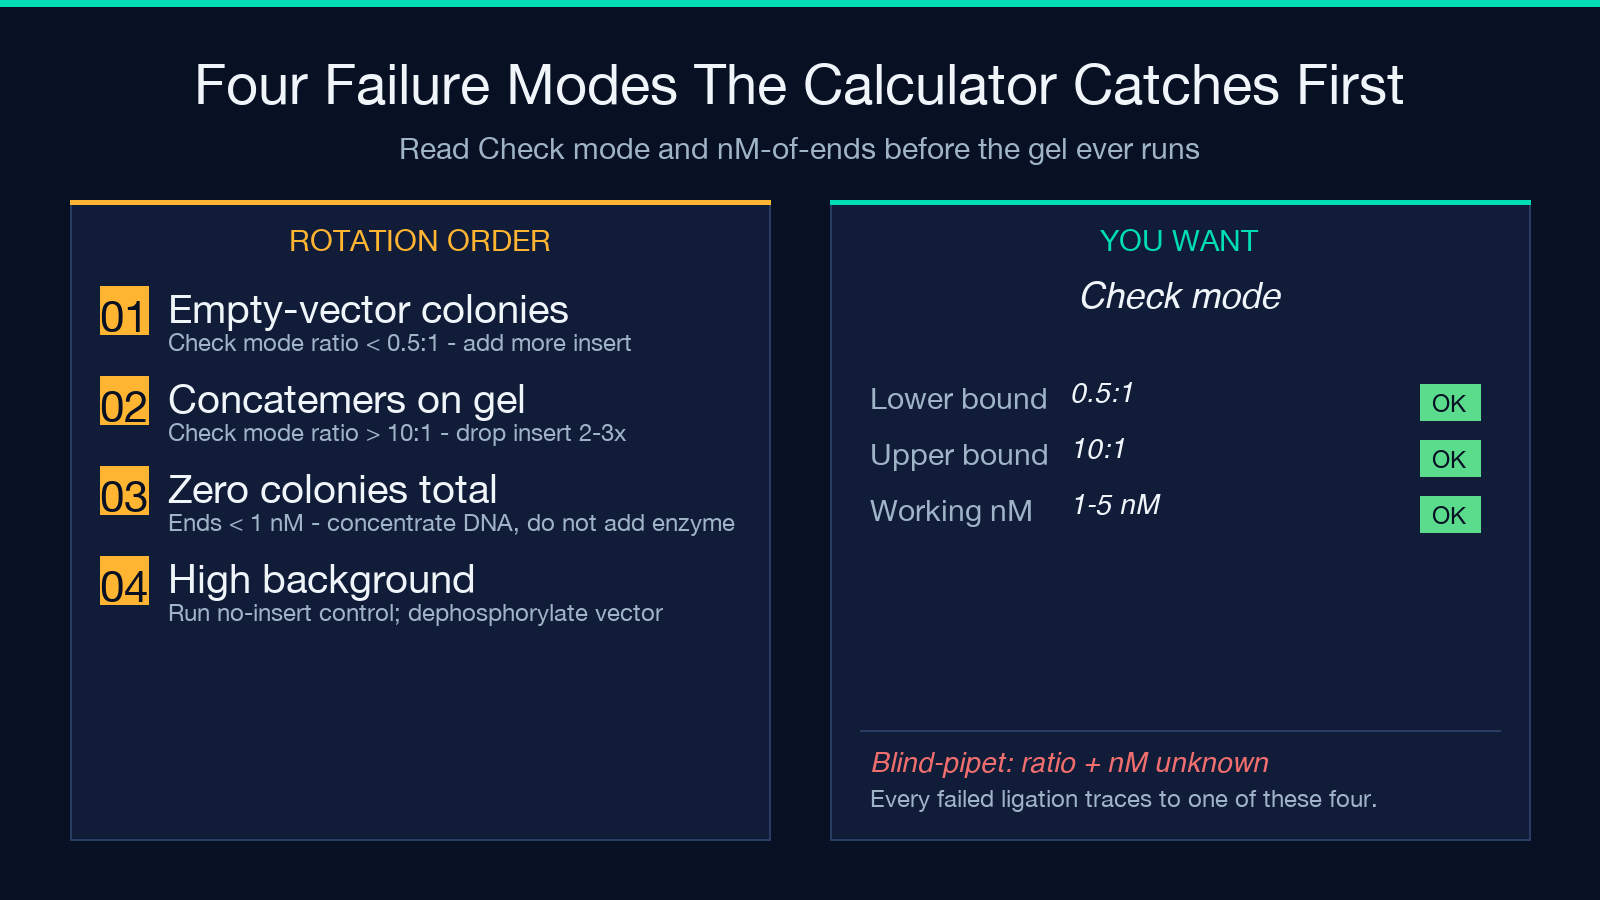
- Empty-vector colonies dominate (under-dosed insert). The Check mode returns a ratio < 0.5:1. Fix: redo the math (the bp of the insert or vector was probably mis-entered), or simply add more insert mass until the ratio lands in the 3-5:1 band. If the insert mass is correct, the issue is almost always a typo in the bp field, not a measurement error in mass.
- Concatemers visible on gel (over-dosed insert). The Check mode returns a ratio > 10:1. Fix: drop the insert mass by 2-3× and re-run. Concatemers can’t be removed after the fact — the ligation has already produced them — but the next prep will avoid them with a corrected ratio.
- Zero colonies on the plate (sub-threshold ends). nM-of-ends < 1 nM, regardless of ratio. Fix: concentrate the DNA (SpeedVac, ethanol precipitation), reduce the reaction volume, or scale up the input mass. Don’t compensate by adding more ligase — that’s a kcat error, not a concentration error.
- High background of wrong-size colonies (vector-only). Often this is the ratio being on-target but the vector being uncut or re-ligatable without insert. The calculator can’t detect this directly — it’s a prep-quality issue, not a stoichiometry issue. Run a no-insert control: if the no-insert plate has near-equivalent colony counts, the vector needs dephosphorylation (CIP or rSAP) before the next prep.
The recipe that ties it all together
The 8-step Worked Example, the 4-mode Troubleshooting checklist, and the 3 ratio bands together cover the ligation setup decisions you’ll make on the bench. The Ligation Insert:Vector Molar Ratio calculator is the place to land before pipetting: enter your vector length and mass, your insert length, the target ratio, and the reaction volume — and read off both the required insert mass and the nM-of-ends concentration. The result is what goes in your lab notebook. Same input on the Check side validates any pre-existing setup before you waste reagents on a transform. Educational/lab-planning use only — confirm cloning outcomes by gel electrophoresis and Sanger sequencing as the final source of truth.
Explore more single-purpose lab-math tools at elysiatools.com/en/tools.
